Showing posts with label deck beams. Show all posts

Sunday, October 2, 2011

Deck beams and such...

Well I managed to finish the paint in the forward section--except a little touch-up here and there--so this week I was able to glue/screw in the deckbeams.  This makes me happy:  maybe not Russian Dance happy but happy-to-be-moving-on-to-the-next-step happy.  I left two out for now, since the first piece of 1/4"-ply deck is a small triangle in the bow.  With the two deck beams removed I'll be able to get in the boat to do glue cleanup for that triangle.  Once I've got all the beams faired and the first piece of decking glued/nailed in place, I'll glue/screw the final two beams and install the rest of the deck.  (I'll reach through the bulkhead for glue cleanup for those deck pieces.) For lightness, I'm going with 1/4" Occume plywood rather than the heavier Meranti.
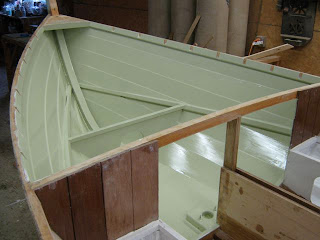
With the paint just about done under the fore deck, I can move on...
Here's the first few deck beams in place.  Since the decking is only 1/4"-thick plywood, I went with a fairly close 6" spacing for the beams.  Note that I've also put in the top of the watertight bow compartment and the store-bought access hatch.  As I think I've mentioned, I'm bedding and screwing all the tops of the watertight compartments in case I want to take them off later for some unknown reason.
That's a grey-green (French grey?) for the interior of the boat.  It starts with Interlux Sea Green plus other mystery colors.  Despite the shine in the photo, it's actually a fairly dull semi-gloss.    I hope you like it!

Until next time...

Saturday, September 10, 2011

Framing out the cockpit and epoxy coating

With Labor Day festivities out of the way, it's back to boat building.  I made some reasonable progress over the last 10 days, take a look:


I finally cut down the top of the transom, no need to do it now...I just wanted to see what it looked like.  Actually, I'm pretty sure I'm gong to "notch" it down further for the outboard and rudder, but this way I get to look at a more conventional transom before taking the jig saw to her again.

Here's the aft half-bulkhead being glued in.  Also, the well is framed out and I've hot-coated a couple of coats of epoxy inside.  I doubt I will paint in there, the epoxy should be fine (completely out of the sun, the big enemy of epoxy coatings).  The two round holes are for small 4" store-bought watertight access hatches.
Speaking of epoxy coating, I also double-coated the interior under the foredeck too.  This will get a coat of something before I put in the deckbeams and install (finally) the foredeck.
Oops, I forgot to show a picture showing all deckbeams cut & fitted, so here it is.  The one that's a bit "shiny" needs a bit of sanding...like the rest of the boat!  The idea is I got all the deckbeams fitted, removed them, and now I'll complete the area under the foredeck--including paint--and reinstall the deckbeams.  I'd rather not paint once those beams are on, thank you very much!
Right now I'm starting on the cockpit seats. First I'm putting in cleats to hold the 1/4" plywood fronts and tops.  These will form watertight compartments both for bouyancy and storage.  This will be epoxy-coated, painted, then, over that, I'll make slatted seats to actually sit on.  (Slatted seats are more comfortable, IMHO.)  I haven't 100% decided what wood to use: perhaps white pine or possibly Douglas fir.  (You're right, I can't afford teak.) Either way, the slatted seats will probably be oiled with perhaps a varnished edge-piece just for fun. Part of the fun and challenge of building your own boat is making just those kinds of decisions.
Until next time...

Friday, September 2, 2011

So what's new for Labor Day?

Happy Labor Day, everybody!  I'll be taking a few days off from boats--real life does intrude on building BELLE occasionally--so here's just a couple of photos of the interior work accomplished so far:

Laminated deck beams going in, starboard bulkhead fitted and ready for installation (including cleats that will support the future cockpit seat top and side), port bulkhead almost ready.


View from over the stern, the boat is really starting to come together. With a bit of imagination I can picture the boat pretty well:  foredeck in place, seats running along the seat risers on the hull, floorboards in place...


Next time, I hope to have a number of bulkheads glued/screwed in place and other work progressing.

Saturday, August 20, 2011

Inwales, seat risers, and epoxy clean up...

With the boat finally right-side-up, there's now the fun job of cleaning up various goobers of dried epoxy on the inside of the boat.  Mostly that's done with a heat gun and scraper, but a fair amount of sanding is involved too.  Like the outside, the interior of the boat will be epoxy coated--boats seem more likely to rot from the inside out, from fresh rain water rather than salt water--but I'll hold off on that for now.  First there's the inwales to get in, and then on to the bulkheads.  After those items are glued/screwed in place, I'll coat the whole interior.

In the foreground, the first inwale is being glued/screwed to the boat.  In the background, you can see that the inside of the hull has been cleaned up:  epoxy goobers removed, gaps and dings puttied, and the whole thing sanded.

Another view of the inwale going on.  Lots of clamps.  Those "splotches" on the hull are putty that I've applied to fill various holes and dings.  As you can see, the port side of the hull has been sanded (the splotches look paler because of the sanding) while the starboard side will be done soon.  One thing I'm anxious to do is to cut down the transom to the final shape, but all things in their time.  Right now, the top of the uncut transom, which is dead flat, is an easy place to adjust the boat to make sure it is level side-to-side.  I leveled the boat side-to-side and fore-and-aft at this point, to make the next step easier...
With the inwales in place, I then planed down the top edge  of both the inwales and the seat risers.  I used a level to make sure the top of the riser is level athwartship and well as fore-and-aft in the cockpit area.  Actually, the seat riser has a gentle "S" shape: it slopes downward aft (the future engine well), level amidships for the cockpit area, and it has a slight upward slope forward so that if any water gets under the deck it will flow aft.
Another view.  Not shown is a deck beam mold that I used to set the angle for the top of the inwales.  Unlike the seat risers, the tops of which are level, the inwales actually angle up a bit to match the crown of the deck.  I've got a six-foot-long deck beam mold so I can easily see that angle (I'll try to get a photo of it next time).
Today's final photo shows the deck beams being glued up.  These full-width beams (laminated from Doug fir) will support the foredeck;  simple knees will support the side decks.
That's is to for now, let me know if you have any questions!