Showing posts with label molds. Show all posts

Sunday, March 20, 2011

Setting up the molds

This week, I'm working on some plans for the boat that I hope to post shortly.  These will give a much better idea of what it is that I'm actually attempting to build.  In the meantime, here's a couple of photos of recent progress with the setup...
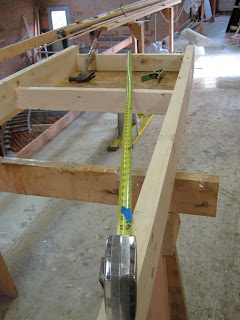


With the basic 2x6 strongback set up, I marked the various station lines on one side and drove a nail into the centerline mark at each end.  I used the centerline nail to "swing" the station points from one side of the strongback to the other.  The scrap piece of blue tape on the measuring tape lets you mark the exact point instead of actually measuring. In general, it's usually better to mark than measure to avoid measurement errors.
At the forward end, a notched 2x4 is attached right down the centerline to hold the future stem in place.  Here you also see the first station going in, using a level to make it plumb before driving the sheetrock screws that hold it in place.

The molds are attached to the strongback by spruce 1x3s. Once everything is double-checked, I'll add another couple of screws.

Here's all the stations in place except for Station 6 (and the transom).  Note handy tool tray that holds various tools accessible to both sides of the boat.  Also, note the taut string along the centerline.  This string is used to make sure the molds are all aligned right on their centerlines.  So far, there are no transverse supports to ensure that the molds are plumb and well braced.  They all need to be plumb and perpendicular to the centerline for the shape drawn in the plans to be accurately reproduced in the boat.  Plus reasonably strong and rigid so the planking process doesn't distort the shape.  In other words, "Sure as the most certain sure, plumb in the uprights, well entretied, braced in the beams, stout as a horse, affectionate, haughty, electrical,..."  OK I'm not sure the affectionate part is strictly necessary.

The bow view as the molds go on.  Hmm, starting to see the shape of the boat now...
 Here's the outer stem getting glued up using the inner stem as the pattern.    

Well that's it for now.  Next week I hope to cut out the transom--using the pattern I made a couple of weeks ago--and add it to the setup.  That and jigger with all the molds to make sure they're nicely plumb and well braced.  And maybe get the inner stem in place too. With all that in place, I can start planking.  Err, no, before that I'll want to put battens all over the setup to check for unfair spots (highs and lows).  And figure out where the plank laps are going to go, since the &$#!?% designer didn't specify that in his plans. Go figure.


Saturday, March 12, 2011

STM (Stem, Transom, Molds)

O. K. come in.  With the lofting done (see last post), it's time to start planking.  OK not quite, but at least it's time to finish the  things that need to be done just before planking, so that's good enough for now.  Specifically, figure out what the "setup" will look like and build the various pieces that go into it.  The setup is the structure on which the hull is built, upside-down in this case, like most small boats.  This week I'm looking to put together patterns for the stem and transom plus a bunch of transverse molds that when attached to the building jig--or strongback, which I hope to make next week--will determine the shape of the hull as it is planked up.  Planking can then actually begin.  Then time for a sail...and drinks on the aft deck...holystoned daily by the crew...but I digress!


Using information from the lofting, I lay out a full-size pattern of the transom--actually just the starboard side of the transom--on a piece of hardboard painted white.  Why only the starboard side?  One reason is it is just easier to make one side only, then flop the pattern over to the port side to mark out the whole transom.  Since the transom should be bilaterally symmetrical, it also eliminates errors in drawing the shape on both the port and starboard sides.  

With the transom pattern drawn up, it's time to draw up a full-sized stem pattern using my fancy carbon fiber batten.  Feel free to use a straight-grained wood batten for your boat...carbon just breaks less, that's all!


Here the laminated fir inner stem is being epoxied using a form screwed to the shop floor...already no room on the workbench.  I used the cut-out stem pattern to make the form and used lots of clamps, of course.  Note that I've wrapped the whole stem with plastic to lessen the mess.  This will easily peel off when the glue dries.


Here's the  glued-up inner stem "blank", cleaned up a bit, laying on top of the stem pattern.  As you can see, the fit looks pretty good along the inside edge.  There's just the little "tail" of the pattern showing at the top of the picture:  I'll glue on a piece later.  Later, I will also do final shaping (cut off the ends to shape etc.) and glue up the outer stem.  It's a bit more time, but in this case I decided to glue up the inner stem first, check it against the pattern to see if there was much spring back (there wasn't), then glue up the outer stem.


Molds

With the stem glued up and the transom pattern drawn (I'll use it to cut out the transom from mahogany marine plywood next week), I next turn to the molds.  (Confused?  Here's a good picture of what a completed setup with molds looks like.  The completed setup for Belle will look similar.) This boat will have seven transverse molds, one for each station line in the design.  An experienced reader of this blog might ask, "why build a bunch of molds, which will not wind up in the final boat, when you can just build whatever plywood bulkheads you need and wrap the boat around that?"  Since Belle is the prototype of a new design, I decided to build a complete set of molds.  This will allow me complete freedom to fair the setup before cutting into a single sheet of expensive marine mahogany plywood.  In addition, unlike some designs, this boat will have few plywood molds in the final boat so there will not be time savings there.  Finally, I will save the molds for later use.

Like the transom pattern, we only have one side of the boat on our body plan for each station. But not too difficult to  cut two identical pieces of mold stock and line them up with the various waterlines and buttocks (yes, buttocks, but don't worry, it's all very serious). 
The time-honored "nail" technique was used for transferring the shape of each station to the mold stock.  First, nail heads are lightly tapped into the plywood body plan.  Next, mold stock is layed on top of the plan.  Finally, a few whacks with the hammer, and a stomp or two for good measure, and the nails leave a clear impression in the soft pine mold stock.  No need to "connect the dots" with a line, you can go right to the bandsaw to cut out the shape.  A sharp eye will note that the nails are not lined up with the lines on the body plan, so what gives?  The body plan is drawn to the outside of the planking.  Since the molds are inside the planking, you need to deduct the thickness of the planking to arrive at the final mold shape.  In this case, the planking will be 1/4" thick, actually 6mm since the plywood is imported.  The bottom will be 5/8" thick;  the garboards will be 3/8". 
The completed mold for station six being checked against the body plan.  I've put the plan on the floor, but feel free to work on yours at bench height, much more comfortable.
I was hoping to finish all the molds this week but, alas, I'm two short.  Still, you can start to see the shape of the boat from the molds.  
Until next time,  À bientôt, j'espère.