This week, I'm working on some plans for the boat that I hope to post shortly. These will give a much better idea of what it is that I'm actually attempting to build. In the meantime, here's a couple of photos of recent progress with the setup...
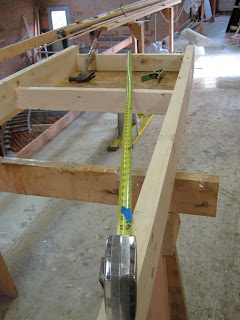 |
| With the basic 2x6 strongback set up, I marked the various station lines on one side and drove a nail into the centerline mark at each end. I used the centerline nail to "swing" the station points from one side of the strongback to the other. The scrap piece of blue tape on the measuring tape lets you mark the exact point instead of actually measuring. In general, it's usually better to mark than measure to avoid measurement errors. |
 |
| At the forward end, a notched 2x4 is attached right down the centerline to hold the future stem in place. Here you also see the first station going in, using a level to make it plumb before driving the sheetrock screws that hold it in place. |
 |
| The molds are attached to the strongback by spruce 1x3s. Once everything is double-checked, I'll add another couple of screws. |
 |
| Here's all the stations in place except for Station 6 (and the transom). Note handy tool tray that holds various tools accessible to both sides of the boat. Also, note the taut string along the centerline. This string is used to make sure the molds are all aligned right on their centerlines. So far, there are no transverse supports to ensure that the molds are plumb and well braced. They all need to be plumb and perpendicular to the centerline for the shape drawn in the plans to be accurately reproduced in the boat. Plus reasonably strong and rigid so the planking process doesn't distort the shape. In other words, "Sure as the most certain sure, plumb in the uprights, well entretied, braced in the beams, stout as a horse, affectionate, haughty, electrical,..." OK I'm not sure the affectionate part is strictly necessary. |
 |
| The bow view as the molds go on. Hmm, starting to see the shape of the boat now... |
 |
| Here's the outer stem getting glued up using the inner stem as the pattern. |
Well that's it for now. Next week I hope to cut out the transom--using the pattern I made a couple of weeks ago--and add it to the setup. That and jigger with all the molds to make sure they're nicely plumb and well braced. And maybe get the inner stem in place too. With all that in place, I can start planking. Err, no, before that I'll want to put battens all over the setup to check for unfair spots (highs and lows). And
figure out where the plank laps are going to go, since the &$#!?% designer didn't specify that in his plans. Go figure.


No comments:
Post a Comment