This week I got some interior work done, so I thought I'd post a few pictures. Basically the plan is to install the vertical bulkheads prior to epoxy-coating the whole interior of the boat. The horizontals will be screwed and bedded--NOT epoxied--so that they can be removed later if necessary. By "necessary" I mean "if I run into a rock, put a hole in the boat, and have to fix it"...God forbid!
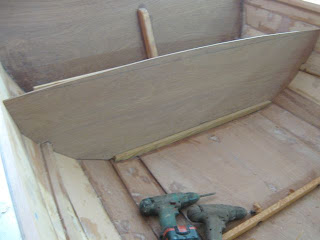 |
| Here's the aft half-bulkhead being fitted. This bulkhead creates an aft well that will drain out the transom; underneath is a water-tight compartment. I don't anticipate using an outboard motor much with this boat--I might buy an electric trolling motor instead--so most of the time the engine will be stored horizontally in this well along with a one or two gallon gas can. A "joggle stick" (see next photo) transferred the shape of the inside of the hull hull to the 3/8" plywood for cutting. |
 |
| Here's the joggle stick used for taking off the shape of the bulkheads: it's the funny-looking stick lying against the hull in the photo. First I hot-glued some scrap together to form a rough "pattern" of the half-bulkhead (which extends up to the seat riser) and positioned it plumb from the floor to which the bulkhead will be attached. The joggle stick is then "pointed" at various key points on the inside of the planking, and the jagged edge is marked with pencil on the pattern. The pattern is then removed and laid on top of a piece of 3/8" ply and the points transferred. With a bevel gauge, I picked up the bevel between the planking and the bulkhead and transferred this bevel to a bandsaw to cut out the bulkhead. |
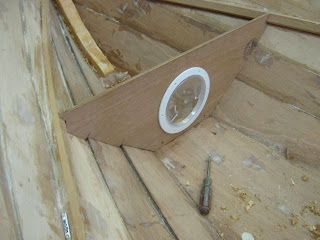 |
| So here's the result: a half-bulkhead that, after a bit of tweaking, fits quite well to the inside of the planking, jogging around the edges of the planks. Next I'll make a cleat along the top of the bulkhead and a 1/4" ply top. A store-bought 6" round access hatch gives access to this watertight compartment, shown here being test fitted. The seats in the cockpit will also be watertight, but I think I'll make my own (larger) hatches for those. It'll be more time-consuming, but the end result should be more attractive. |
 |
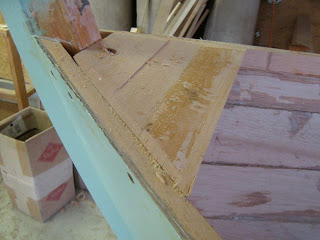
| Meanwhile, back aft, I made a 1/4" ply bottom for the well. It rides on the seat risers port & starboard, and on cleats screwed/glued to the transom and half-bulkhead. With all the pieces cut out, I'll take it apart and screw/glue everything together except for the 1/4" bottom which will stay out of the boat for now. I'll 'glass or Dynel this piece and put it in with screws and bedding compound later, after I've completely epoxy-coated the interior of the boat. |
 |
| Here's the roughed-out breasthook, which will be screwed/glued to the inwales and also one screw into the stem (all are 12x2" bronze screws). Unlike an open boat, where the breasthook is very visible, this boat has a fore deck so a simple Doug fir block is cut and beveled to fit. Note the nail in the centerline of the stem. I hook my tape measure to the head of the nail to "swing" dimensions from one side of the boat to the other. This will become useful a bit later when I start installing the deckbeams. While I've glued those up, I haven't installed them yet since it is obviously easier to work on the interior of the boat without a lot of beams in the way! |
The photos of the bow half-bulkhead reminds me that there are about a million design decisions to make, even on a small boat like Belle. You might ask why I didn't make it a full bulkhead, extending all the way up to the sheer, since that would make for a larger watertight compartment in case the boat takes on water. That's true, but I had to balance that against the idea that a half-bulkhead will make trailering and storing the boat easier. One reason I went with a gaff instead of a marconi rig is the mast in the gaff rig is significantly shorter. This will make it lighter, easier to raise/lower, and easier to trailer/store. With a half-bulkhead, I'll be able to poke the butt of the mast way up into the bow of the boat for storage/trailering, leaving only a few inches hanging over the transom. Not enough to be a nuisance. With a full bulkhead, the top of the mast would extend about three feet off the end of the transom. That's not the end of the world, but decided to avoid it. Knowing that there will also be watertight compartments aft and under both seats, port & starboard, I decided to go with the half-bulkhead: decision number 5,763 accomplished!
That's it for now.
Hurricane Irene is hurtling up the coast, but it should be a mere Tropical Storm by the time it gets to Downeast Maine. At least that's the current prediction. If nothing else, power outages are probably in the offing. Best of luck to all!


