Friday, February 24, 2012

Deck hardware, seats, etc.

With the sails on order, there's just a few more things to take care of before launch day:

Time to bed down the plywood seat-locker tops.  I'm bedding them--rather than using epoxy--so that I'll be able to remove them later for any necessary repair/maintenance. I'm using goopy Life Caulk for the job.
This photo shows both seat-locker tops in place. 
With a second coat of finish paint applied to the deck, the jewelry--I mean hardware--can be bedded with old-fashioned Dolphinite.  Also time to install the slatted seats and floorboards.  The seats are screwed down to the cleats on the seat-locker tops shown above.  There's really just a handful of screws, so these seats will be easy to remove in the fall before wrapping up the boat for the winter.  (For now I anticipate storing the boat outdoors under a canvas tarp.)  They can then be varnished in my "workshop" (OK dining room) at my leisure.

After four coats of varnish (or was it five?), I flat-sanded the transom and put on one more coat.  The red cedar is really starting to look good.
With the mast temporarily stored in the boat--I just discovered the top end fits nicely in the sculling notch I cut in the top of the transom--I can take a breather to take care of some "real world" business...I start a new job on Monday!

In the above photo, note how the mast only overhangs the transom a few inches.   This is a benefit of going with a gaff rig--or lug rig, for that matter--with its relatively short spars compared to a marconi rig.  


I'm putting together a list of "Year Two" updates/changes for the boat, things I'm willing to put off a bit so I can go sailing this summer.  One thing on the list is the various hatches for the under-seat lockers.  I've got them cut out and rough-sanded, but they still need a bit of fussy work (including making a bunch of thumb cleats) that I think I'll put off at this point.  They'll make a nice winter project next year.   Ditto the canvas dodger and boom tent that I plan to make.  The dodger will snap onto the coamings at the forward end of the cockpit;  the boom tent will be a simple tarp tied down to various cleats on deck to keep rain out of the cockpit.

Well that's it for now.  As mentioned above, I'll be taking a little vacation from BELLE until the sails come in.  With luck, they will be done in mid-March, then there will be some rigging work, and then I'll have her in the water not long thereafter.  Almost exactly a year of part-time work...but who's counting!?!

Wednesday, February 15, 2012

Outside for some rigging

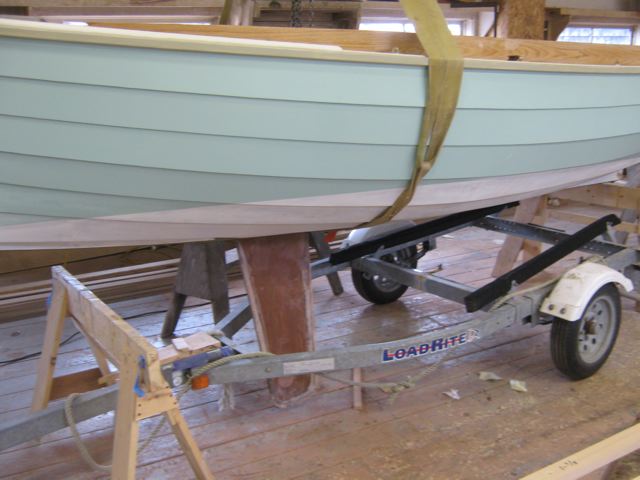
Just a quick update this time to show BELLE outside for rigging/hardware work!  It was a warm winter day, so I rolled her out of the shop and put in the mast.  No problem for one person.  Then I worked out the final location of fairleads and such using odds and ends of rope.

Here is BELLE rolled out of the shop, ready for rig/hardware setup.  


Mast in place, I'm using pieces of old rope to get final measurements for various pieces of standing/running rigging.  Only two coats of varnish on the spars at this point, I'll get a couple of more on before launch day.

Here I'm locating a deck fairlead.  My plan is to use a modern low-stretch rope (Spectra) for the side shrouds instead of wire.  These will run through blocks to small cleats on the side decks.  The lozenge-chaped piece of oak in the photo will hold one of the staysail camcleats to the coamings (see next photo).
Back in the shop, here's one of the staysail camcleats installed on the coamings.  The coamings need a couple of more coats of varnish, then I'll get another coat of paint on the decks and rubrails.  
The sails are now on order from Bohndell Sails in Rockport Maine (sorry, they don't have a web site or I would link to it), and I ordered a bunch of rope from RW Rope.  The sails should take 4-6 weeks, so I've got a few more weeks to varnish and leather the spars and do various detail work.  With the sails in hand, I'll then be able to do the final setup of the rig...and take her for a sail!  Weather permitting, I'm shooting for the end of March.  In the meantime, there's more paint/varnish, of course...

Friday, February 3, 2012

Details details...

A boatbuilder said to me the other day:  "Why does the last 10% seem to take 50% of the time?"  So true!  Once the hull and major parts are done, it's a mad dash to the finish line.  The last few weeks seem to go on forever, as you get more and more anxious to see her in the water and take her for a sail.

 Lots of details left to do, here goes:

Here's the bronze centerboard pull in place.  I left it a bit long for final in-the-water testing.   I'll be able to notch the bar to allow a couple of intermediate centerboard settings, in addition to the usual all-the-way-up and all-the-way-down.
To test the centerboard pull mechanism, I lifted the boat up using a strap and an overhead chain hoist.   It checks out fine.
Here's a couple more bronze pieces ready for installation.  First, I fabricated a jam cleat for the mainsheet using a standard closed-base bronze cleat and some brass sheet (top piece).  Then, for the mast, I made a tang for the throat-halyard block with some leftover bronze half-oval, a short piece of copper tubing, a washer, and screws (bottom piece).  The throat-halyard block hangs from this tang, which holds it away from the mast.  A detail found on a lot of gaff-rigged boats.
The boom jaws are glued and screwed to the boom, with one copper rivet too.   Since this photo, I've completed the jaws for the gaff too, and sanded everything (locust "burns" easily as you can see) and started on the varnish.  The final touch will be to tack pieces of leather to the jaws (to protect the mast) once a couple of coats of varnish are dry.  I have some rugged dark-brown leather that should work well and look good various places on the boat that are prone to chafing.
I also used locust for all the cleats and reefing blocks (if that's what they're called) for the mast and boom.  All the cleats on the spars will be locust;  the cleats on deck will be bronze.  This picture shows the cleats just after bandsawing them to shape and just a bit of rough sanding.  The very top cleat is the first one ready for varnish.  Simple paper patterns as shown are used to mark the locust for cutting.

Next week I'm going to run the boat outside on the trailer, pop in the mast, and get various dimensions for the rigging.    I've also mailed out a couple of sail plans to local Maine sailmakers.  Once I hear back from them, I'll place the order for the sails.  I considered making the sails from a Sailrite kit, but I eventually decided to buy "ready made" sails.  I just don't think I have time to finish the boat AND make sails before the spring!  Until next time...