Friday, October 28, 2011

Finishing off the deck

This week I finished off the deck, so here's a few photos of how it all came together.


This shot shows the various blocking pieces cut and fit.  These are made of scrap 1/4" ply left over from planking/decking, and they add strength to various key parts of the boat.  For example, the foredeck will support a mooring cleat and, of course, there will be a hole through the deck for the mast, so there's a fair amount of blocking in that area.


With the blocking done, I finished rough-cutting the various 1/4" ply deck pieces.  Here are all the pieces drilled for screws (little #6x3/4") and ready for glue up.
This is called a "jump stick".  It lets you "jump" over something to mark on the other side. In this case, I'm marking the inside edge of the plywood deck where it meets the carlin.

The shrouds will be attached using these 1/8"-thick bronze tangs which stick up through the deck.  Two bronze machine screws go through the clamps and, for good measure, the tangs are bent around and under the clamps. This transmits the load coming from the shroud directly to the clamp which is securely glued/screwed to the hull and decking.

Here are the four tangs, ready for installation.  Why not two, you ask, since there's only one pair of shrouds?  Well, for fun I'm going to have two "settings" for the shrouds:  a "single handing" setting using tangs along the sheer about one foot aft of the mast and a "racing" setting where the tangs are about four feet behind the mast.  The shrouds, which will be made of wire with rope tails or possibly a modern low-stretch rope like Spectra, will terminate at a cleat on the coamings (not at a conventional turnbuckle) so I suppose these would technically be called running backstays.  When in the "racing" setting, the shrouds will provide extra support to the top of the mast but also require resetting for each tack.  The "single handing" setting should provide more-than-adequate support and, importantly, won't require resetting when tacking.  In either case, the windward shroud can be slacked off if necessary while running.  Note that this feature is NOT shown on the Sail Plan at my Sketches and Plans page...which I'll update after the boat is done.

OK I'm finally ready to glue in the deck pieces!  I started with the forward triangular piece.  I broke the deck here so that I could reach forward under the deck to clean up any glue mess.  The deck is screwed down about every 18" with addition small ring nails as needed...but, as usual with this type of construction, the glue is doing most of the work. 

Here's the rest of the deck getting glued in place.  I'll put some epoxy putty in the various screw holes and dings and sand it smooth for the Dynel later on.

Well that's it for now.  Next time I'll have some photos of the Dynel going on the deck...plus the start of the spars.   I figure it's about time to start on those since they will need multiple coats of varnish and I don't want that to hold up the launch spars.  Plus it's a fun thing to do, so I don't mind getting started...  

Wednesday, October 12, 2011

Foredeck and side decks


I think I've cut up my last sheets of plywood for this project!  Two final sheets of 1/4" occume were consumed in making the top of the deck, with nice chunks left over to make things like locker fronts later on.  So here goes:


Here I'm test-fitting the small triangle of deck at the bow.  The edge where it butts to the next piece of deck is backed by an additional layer of 1/4" ply underneath.   I've let this into the deckbeams and inwales using a router bit to cut a 1/8" rabbet.


With the foredeck coming along, I made up the side deck support knees from 3/4" Douglas fir.  I could have made them from scrap 3/8" ply and filleted them in place, but I had some nice clear fir on hand and personally prefer the look of it.  These knees will support the side deck and coaming, and tie them into and provide support for the top two planks.
Here's the carlin being glued/screwed to the knees and bulkhead.  The coamings will be screwed to the inside of this carlin and come to a point on the foredeck about 18" forward of the bulkhead. Note that the carlin slants back about 10 degrees for more comfortable seating.
Here's a close up of the last "bay" between the carlin and the inwale, just forward of the transom.  You can just see the 1/8" rabbet routed along the edges.

A backing of 1/4" ply fits into the rabbet shown in the last photo.  It provides extra support for this corner of the boat and a good place for a stern mooring cleat. Basically it replaces a conventional quarter knee.  A similar backing block will also be made everywhere that the plywood deck pieces butt together. 

With the various deck pieces rough-cut, I  layed them out on the boat...just to take a look!  In my mind's eye I can see the coamings coming to a point forward of the bulkhead.  BELLE is really starting to come together.  Next step:  marking all  the carlins, deck beams, and knees underneath the deck pieces, flipping them over, and drilling for the various fastenings (a mix of #6 screws and nails) which, along with the inevitable glue, will hold the deck in place.  Once I've got every last piece cut and temporarily screwed to the boat, I'll take it all apart, label everything in sight, and start painting the undersides.  At that point, I'll get to start on the spars, hurrah!

Sunday, October 2, 2011

Deck beams and such...

Well I managed to finish the paint in the forward section--except a little touch-up here and there--so this week I was able to glue/screw in the deckbeams.  This makes me happy:  maybe not Russian Dance happy but happy-to-be-moving-on-to-the-next-step happy.  I left two out for now, since the first piece of 1/4"-ply deck is a small triangle in the bow.  With the two deck beams removed I'll be able to get in the boat to do glue cleanup for that triangle.  Once I've got all the beams faired and the first piece of decking glued/nailed in place, I'll glue/screw the final two beams and install the rest of the deck.  (I'll reach through the bulkhead for glue cleanup for those deck pieces.) For lightness, I'm going with 1/4" Occume plywood rather than the heavier Meranti.

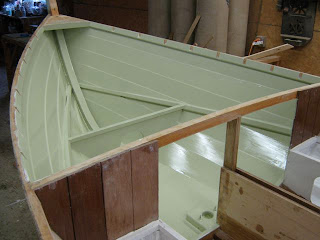
With the paint just about done under the fore deck, I can move on...
Here's the first few deck beams in place.  Since the decking is only 1/4"-thick plywood, I went with a fairly close 6" spacing for the beams.  Note that I've also put in the top of the watertight bow compartment and the store-bought access hatch.  As I think I've mentioned, I'm bedding and screwing all the tops of the watertight compartments in case I want to take them off later for some unknown reason.
That's a grey-green (French grey?) for the interior of the boat.  It starts with Interlux Sea Green plus other mystery colors.  Despite the shine in the photo, it's actually a fairly dull semi-gloss.    I hope you like it!

Until next time...