Showing posts with label wood boat building daysailer. Show all posts

Friday, November 11, 2011

Making the birdsmouth mast and more

One of the fun things about boatbuilding is next:  spars!  For this boat, I'm making a solid-wood boom and gaff plus a hollow mast (to save on weight aloft).  I decided to go with the "bird's mouth" technique for the hollow mast.  All the spars are made with nice clear Douglas fir.  Why not Sitka Spruce, you ask?  Well, have you seen the price of Sitka Spruce lately?  Also, Doug fir looks very nice varnished--nicer than many types of spruce, in my opinion--and the weight difference won't be significant for this boat I don't think.  Gaffers like BELLE have relatively short masts, so that helps too.  If you want to know more about wood spars, here's a few links:


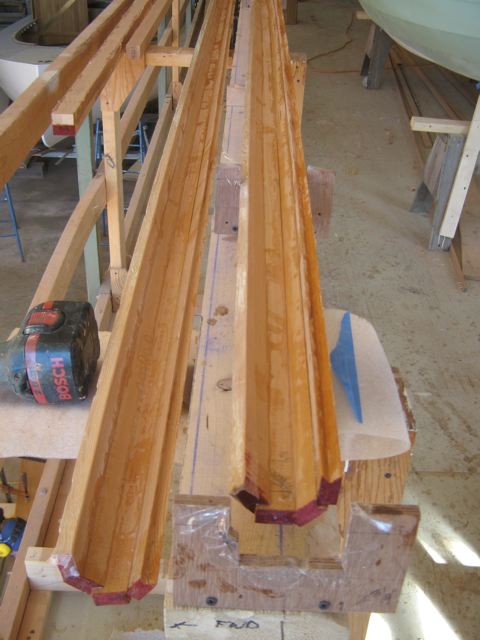
First I ripped out eight identical strakes on the table saw with the trademark "birdsmouth" on one side.  Since the spar tapers at the top, and a bit towards the butt too, each piece needs to taper as well.   I marked one piece with a batten, rough cut it on a band saw, and planed down to the line.  I then used this master to mark a second piece and cut and planed that one down too.  I then used these two identical "master pieces" (so to speak!) to plane down the remaining six pieces to size.  In this photo, the master pieces are on the outside, separated by spacer blocks from three strakes that I'm planing down to size. As you can see, the plane (a #5) rides on the "masters" and cuts down the inner three strakes.  A couple of passes with a power plane got things started. ( There are various ways of cutting out these strakes...using routers etc...for a small spar like this I'd say this worked quite well.)

I'm going to use pipe clamps to glue up the spar, here's a test run.  I'll double the amount of clamps shown in this photo for the actual glue up.
Voila...the glued-up spar.  This is actually Phase One.  A strip of packing tape along two strakes allows me to split the spar open to add blocking...see next photo. To the left of the mast are the "blanks" for the boom--glued from two pieces--and gaff.  I'll eight-side, then 16-side, these the old-fashioned way.  The hollow mast starts out eight-sided, so it only needs to be 16-sided on it's way to becoming round in section.  Then a bit more planing and a bunch of sanding to produce the final tapered, round spars.


With the spar opened up, I'll now shape blocking at the butt, deckline, and top to add stiffness to these areas.  In theory you could do it all in one step...but it seemed easier to do it in two discrete steps.  Once the spar is glued back together, I'll then shape it to 16 sides with planes and then sand it round. 

Meanwhile, I made up this centerboard pin from 3/8" bronze rod.  The plywood discs have pieces of 3/8"-inside-diameter bronze tubing to act as guides.  These will be screwed/glued to the side of the centerboard case.  There are removable brass plates (not shown)  on the outside to hold the pin in place...and keep water from getting in the boat.  There will also be a piece of bonze tubing embedded in the centerboard for the pin to run through.
Here's the discs shown in the last photo being glued to the side of the centerboard case.. I also screwed/glued cleats on each side of the case, towards the top.  These cleats line up with the tops of the seats and will allow me -- if all goes well -- to have lift up floorboards.  To make a (relatively) large "sleeping platforn",  the forward floorboards will fill in the space between the side bench seats and the centerboard case, resting on these cleats.  Not clear?  Well I'll be working on that in a bit, more photos to come...
Finally, after much hand-wringing, I finally cut down the transom!   This changes the whole look of the aft end of theboat...and I have to say I'm happy I did it.  Yes, that's a 35-yr-old British Seagull Forty Plus hanging there...my father bought it new years ago...and it actually runs!  There's a temporary piece of plywood clamped to the transom to protect it from scratches.  I have a nice block of yellow pine that I'll use as the final outboard clamping block.  To be honest, I may buy a more, umm, modern outboard at some point.  But the ol' Seagull will be the Official Power on launch day, that's for sure.

Next time:  more work on the spars plus maybe get started on the floorboards and seats.  Until then, good night and have a pleasant tomorrow.

Saturday, March 5, 2011

Wilkommen, Bienvenue, Welcome!

Welcome.  I hope you're in the right place.  This blog will be about the design and construction of a 16ft daysailer that I've just started building.  "Belle", I call her, and I hope she lives up to her name.   I should warn you that I've never blogged before, so please forgive the occasional blog-blunder.

I'm going to start, not at the beginning, which would be sensible, but where I am now:  lofting the boat.   (If you like, you can see a little background about me and this boat at the end of this post.)  Since this is a brand-new design, I wanted to make sure I had a really fair set of lines to begin with.  My original sketches for the boat were done on 11x17 paper, which is too small to directly scale.  In other words, the width of a pencil line on the sketch could easily be 1/2" on the boat, easily visible to the naked eye.  I borrowed an idea from Harry Bryan (I think it was in WoodenBoat magazine 196) to loft the profile and plan view at 1/4 scale, where 3" on the drawing is 12" on the boat.  I got a piece of mylar for the these lines, but I used a cheap piece of luan plywood (painted white) for the body plan, which is drawn full size.  This body plan is used to make the molds that are then used to build the boat.  Yes, there are a few preliminaries to take care of before the sawdust flies!

I'll have more info. on the design in a later post--I'm going to try to post new entries and photos weekly--but for now here's a brief rundown of the basic specs:

Length -- 16'
Beam -- 6'
Draft -- 9"
Rig -- gaff sloop, approx. 125 sq ft
Displacement -- approx. 720lb including crew (to DWL, Design Water Line)
Construction -- epoxy glued lapstrake


The body plan is drawn full size.  This will be used to make the molds, which will then be used to build the boat.  Got it?

Hmm, I suppose a block of wood wedged between the table and the batten can be used to add a bit more "English" to this curve... 

The batten I'm using is actually made of carbon fiber which turns out to make excellent battens.  Left over from a spar-building project a while ago.

Believe it or not, you're looking at +$200 of epoxy goos and supplies.

Here's the final lines drawing, drawn out at 1:4 scale on mylar.   Later, I'm going to have this drawing shot down to 11x17 format for easier reproduction.

Here's a hand-drawn version of the lines drawing.  Once the boat is done I'll make a new version of it and various construction drawings showing all the updates and ideas incorporated during construction.
OK so I didn't clean this one up, here's part of one of my sketches, where I work out various details of Belle's construction in my mind and on paper.
So that's it for now.  I hope to have some decent drawings of the boat next time, plus some photos of various fun things like transom patterns, a glued-up stem, and a setup at least starting to come together.

By the way, if you've gotten this far and are still interested in the mysteries of lofting, Chapter 7 of Greg Rossel's Building Small Boats is excellent on the subject. (Good all-around book too.)

A little background...

I sold my last boat, a 13' Joel White Pooduck, a couple of years ago and agonized through last summer without a boat which was a horrible experience not to be repeated.  (A terrific boat, and fun to build, I really have no idea why more Pooducks haven't been built.  You see Shellbacks by the dozen all over the place, but I've never seen a Pooduck in the wild except for mine.) There are loads of used boats for sale around here (coastal Maine), so I suppose if I was sensible I would have just bought one of those and been done with it. But, alas, I build wood boats for a living in Brooklin Maine and that thought was furthest from my mind!  I am really fortunate to have an understanding boss who is letting me build my boat at his shop.  So if any of the photos look suspiciously professional, that's why.  But, I assure you, this project is all me, win lose or draw.  Over the years, in my spare time I've built Pooduck, a couple of Nutshells, a Bolger 20ft cat-yawl and, years ago, an Optimist pram, but this is the first boat I've designed for myself. So failure--or world-astonishing success!--is all mine to enjoy, gulp.  I'm hoping she'll be an interesting blend of old and new that people will find intriguing.  She'll have some "old" features like nice steam-bent coamings, but also some "new" ones as well such as modern epoxy lapstrake construction.  My main inspirations for this boat have been: myriad Bolger boats, Spartina and the lapstrake Chebacco, to name only two; the wonderful Herreshoff 12-1/2s and other classic daysailers; and Joel White's Pooduck.