Thursday, December 15, 2011

More paint plus progress on the rudder

It's funny how progress seems to be slow slow slow...until you start putting paint on things and the project seems to speed up!  I was going to start on the coamings this week, but I'm expecting to take a look at some nice white oak this Monday so I decided to put it off and keep painting and working on the rudder/tiller/centerboard/etc.


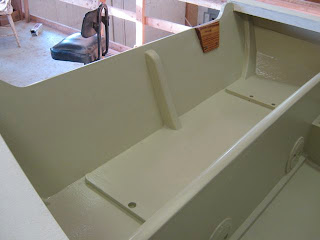
First coat of finish paint on the interior and deck.  It looks awfully green right now!   Once the floorboards, seats, and coamings are in place, actually not much paint will really be visible.  Still, a nice grey/green IMHO.  Notice that the centerboard top is not in place yet.  I'm hoping to have an offcut from making the coamings for that.  That way they'll match nicely.
Another view.  The deck paint is a semi-gloss white with just a smidgeon (OK, an ounce) of the grey-green mixed in.

Here's the aft well...only needs the drain holes now.  See previous post for why there are holes in the bottom cleats...
The rudder hardware is a mix of Dyer gudgeons and upper hanger and a shop-made lower hanger.  I'm about to clean up the lower hanger (which has just been fabricated) and fit it to the end of the skeg.   
I used a router (with a pattern) to inset the upper hanger into the transom.   Here I'm doing a test fit.  I'll have another photo of the final rudder and hardware in place later.  You can see the grain of the Western Red Cedar in this photo.  A couple of more coats of varnish and a couple of summers in the sun and this should "deepen" further into a nice glow.  At least that's what happened on the W.R.C. seats of my previous daysailer.
A quick test-fit of the roughed-out rudder.  I've got it covered in Dynel below the W.L.(actually 1" above the W.L.)  and I"ll be epoxy-coating it above the W.L.  Still to come are the cheeks and tiller.  (The white circle near the bottom is a hole that I'll fill with lead and epoxy to keep the rudder from floating too much.)  Note that I've gone with a simple one-piece rudder rather than the more usual kick-up rudder...I'll discuss this more later.


OK that's it for now, so long!

Monday, December 12, 2011

Finally getting to the coamings...

Christmas draws ever nearer, and I'm trying to get as much done as possible before a week-long break...

At this point, I'm getting to finish work when I can while completing the fabrication of the remaining parts of the hull.  Here's the third coat of varnish on the transom with the yellow pine outboard pad in place.


Had to make the centerboard sometime, so here goes.  It is 3/4" plywood with 'glassed edges.  Later I'll add a small slug of lead to weigh it down a bit and coat the whole thing with epoxy.


Time to make the pattern for the coamings.  As you can see, first I made a temporary jig to hold the bow end of the coamings in place while I made the pattern.  This gives me a chance to eyeball the look of the coamings without cutting any expensive timber.   To make the patter itself,  to start with I scarfed some scrap 1/4" luan plywood together to make a piece about 8"x14'.  With a bit of marking and shaving, I was able to get a pretty good fit to the deck. It's a bit hard to see, but I deliberately made the pattern a couple of inches short at the aft end and then hot-glued a piece of ply to record the exact angle of the transom.  This saves a bit of fitting and shaving.   Once I was happy with the pattern,  I  flopped it over onto the other side of the boat to take a look.   I was glad to note how close it fit to the other side.  Of course, in theory the pattern should fit exactly but sometimes in boat building "stuff happens" and one side of the boat isn't quite the same as the other.  But in this case I can use the same pattern for both sides, hurrah.
I put in the aft well with screws and goo.  Once the goo cures for a few days I'll clean it up with a razor knife.  The unpainted cleats hold the Seagull outboard in place horizontally in the well for when it is not in use on the transom.  They also provide a bit of fore-and-aft stiffness to the bottom of the well (which is 1/4" ply).   The bronze thingamajig is the "quick release" transom mount for the Seagull.

I haven't shown an overall view of the hull in a while, so here it is.  Still a ways to go but starting to look pretty good I'd say!

I'll try to have a final end-of-year post, maybe with some reflections on the project so far, so until then I'll just say à bientôt...